Adobe Premiere Pro CC certainly isn’t the most stable or glitch-free NLE on the market, but it is one of the fastest, most robust, and codec friendly software offerings. And if you’re like me, you’ll take your software a bit glitchy as long as it’s the most cutting edge and performance driven.
The best way to get the best performance from Premiere is to use ProRes Proxy files…but the client needs this edit tomorrow and there’s no time to transcode everything! We need to start editing now and we need Premiere to be able to keep up with our blazing fast editing skillz!!! So let’s discuss how to squeeze the most performance out of our favorite, crash loving software:
1. Enable GPU Previewing
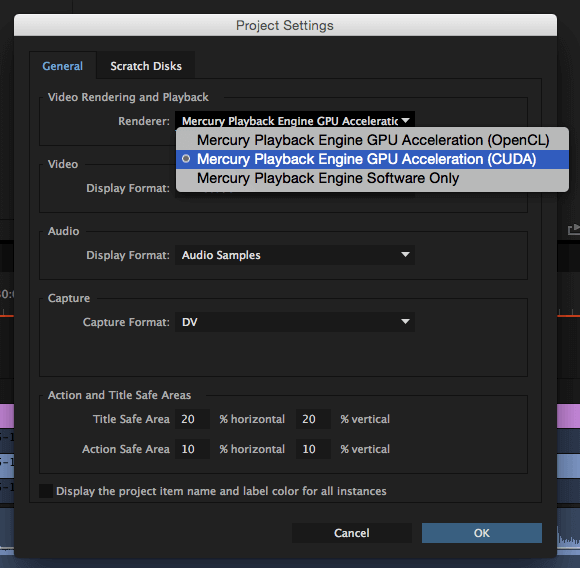
Premiere can realtime preview video in 3 different ways: CPU (software only), OpenCL (AMD graphics cards), and CUDA (Nvidia graphics cards). By default, software only is selected because not all systems have graphics cards. If your system doesn’t have a dedicated GPU (graphics card) then you won’t be able to select the GPU Acceleration options and you will be forced to stick with the subpar Software Only setting.
If you do have a dedicated GPU, which is definitely preferable, then you should select a GPU Acceleration option. To change this setting go to File/Project Settings/General… then use the Renderer dropdown menu to select your preference. If you have an AMD GPU then select OpenCL rendering. If you have an Nvidia GPU then select CUDA.
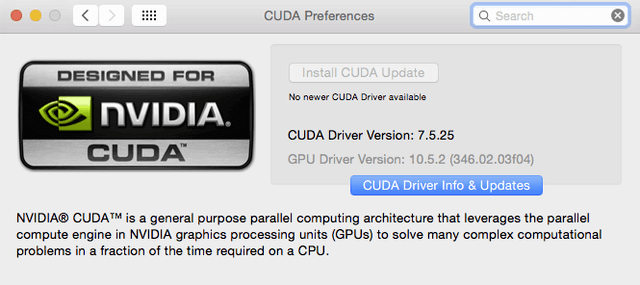
Note that Nvidia GPUs with more CUDA cores will have better performance so definitely purchase cards that have the highest number of CUDA cores that you can afford. Also, if you have an Nvidia GPU, then make sure to install the CUDA driver and keep it up to date. Nvidia CUDA for the win!
2. Point Media Cache to Different Drive from OS
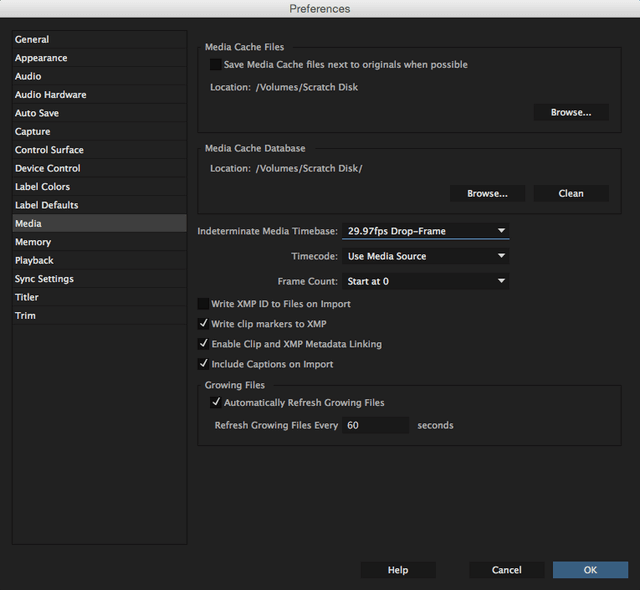
By default, your Media Cache files are stored on your OS drive. This works fine and all, but it’s not optimal for performance because you want your OS drive to be focused on delivering its best read/write performance to your OS and your applications.
Instead of allocating these precious resources to your OS drive, move your Cache to a separate drive. When I build systems, I always dedicate a 500GB SSD strictly for cache purposes and I point the cache files to that drive. The faster the cache drive, the better. So try to use an SSD or even better an M.2 SSD. If you insist on using a spinning disk drive then at least use a 7200rpm drive.
3. Decrease Preview Resolution if Necessary
Premiere does its best to realtime preview your timeline so that you don’t have to transcode your videos or wait on render previews. However, even with a fast computer and GPU, sometimes what you have going on in your timeline is still too much to handle and you will notice stuttering video and laggy performance.
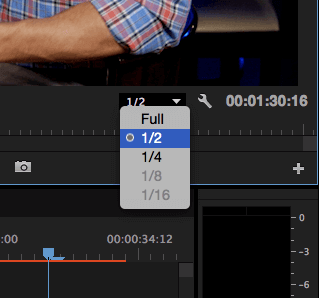
If this happens, try reducing your preview resolution located on your Program monitor window. Doing this is typically necessary for RAW footage; unless you have a beastly system! Furthermore, unless your program monitor is displayed full screen, there is typically no need to preview in full resolution because your monitor probably can’t display all of the video pixels anyway (i.e. your timeline preview monitor is only occupying the upper right portion of your computer monitor).
4. Disable Clips When Not In Use
Premiere previews the top video track layer of your timeline. It stands to reason that if you have multiple clips on video tracks below your top layer then performance should not be affected since only the top track is previewing…right?…WRONG! Even clips underneath the top layer video track use up system resources and will slow down performance.
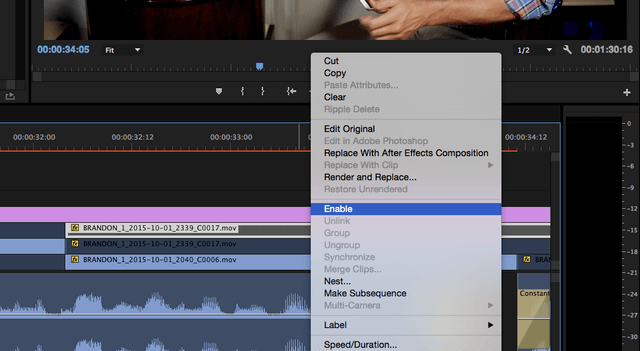
Instead of being destructive and deleting these clips, simply right click and uncheck the Enable option in order to disable the clip. This will ensure that you can use this clip again if you so choose to by re-enabling it; but in the meantime it won’t take up resources and slow down your timeline preview.
Pro tip: use the keyboard shortcut cmd+shift+e (ctrl+shift+e on Windows) to enable and disable clips instead of right clicking.
5. Edit in a Sequence that Matches Your Footage Settings
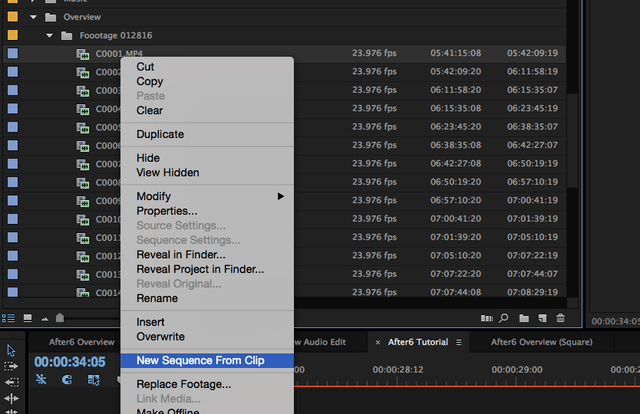
Premiere performs best when previewing a sequence that matches the native properties of your footage. Therefore, when you create your sequence, you should right click on an imported clip and select New Sequence From Clip.
Premiere will then create a new sequence that matches the resolution, codec, and frame rate of your clip. I know that many of you are thinking “But I like to make a 1080p sequence and import my 4K video so I can downscale it in order to reframe.” Doing this is a great practice and certainly much better than upscaling (never upscale!) but all that downscaling takes a performance hit on Premiere.
Instead, I recommend doing all of your edits in native resolution and then once you’re ready to do your reframes, create a new 1080p sequence and copy and paste the contents from your native sequence into your new 1080p sequence. Then do all of your reframes because at that point you won’t care as much if your video is stuttering since all of your edits are done and you’re just fine-tuning.
BONUS TIP: Use an Adjustment Layer for Color Correcting
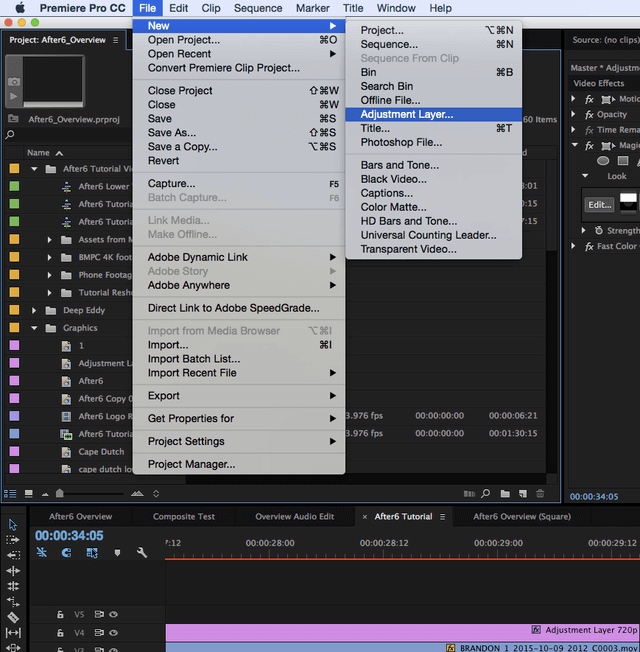
To create an adjustment layer, your Project window must first be selected (it should be highlighted by a thin blue box), then select File/New/Adjustment Layer… Premiere will then create an adjustment layer file in your project window that you can insert into your timeline. An adjustment layer affects all layers that are below it so keep this in mind when you’re editing because you may not want your graphics to be affected by the color corrections of your adjustment layer. If this is the case, simply put your graphics above your adjustment layer.
Adjustment layers are great because they are an easy way to on/off your color grade at a universal level (instead of going into the effect controls of each clip independently). There is a performance benefit to this as well because if you want to watch your timeline for the edits then you want to see it playback as smoothly as possible so simply eyeball off your adjustment layer and watch your timeline playback like butter. Then, when you’re ready to tweak the grade, simply eyeball back on your adjustment layer.
Another way adjustment layers can benefit performance is if your sequence resolution is lower than your clip resolution because adjustment layers are based on your sequence resolution. Therefore, all of the effects on your adjustment layer will be rendered at the lower resolution of your sequence, rather than being rendered at the higher resolution of your clips.
Wrap Up
Next time Premiere is being so laggy that you want to hurl your computer at the wall, try implementing these performance enhancing tips to see if it will smooth things out for you. Let me know in the comments below if you’ve come across other performance enhancing tips because I’m all about eking out top efficiency!
23 Responses
Thank you thank you and thank you. Feels like I’ve got a new machine….ok thats a slight exaggeration but boy does it feel quicker.
offline editing aka proxy media
Create low-resolution clips for offline editing
Capture or import assets into the Project panel at full resolution.
In the Project panel, click the New Bin button, and name a bin for your low-resolution clips.
Launch Adobe Media Encoder, and add all the clips for your project to the Adobe Media Encoder Queue.
https://helpx.adobe.com/premiere-pro/using/create-clips-offline-editing.html
ohhh well you wrote in the title without using proxies …. but give readers info what that option is 🙂
Hi, Thanks it speeds up my machine, Facing lots of trouble before doing these settings to my PC. Really this will help me a lot. Keep updating post like this
Export a render then place the rendered file on the timeline. Let’s say you have done some Lumetric Corrections, basic grading, highlight the video file on the timeline, go to, file>export>choose the resolution (I choose equal rez) down the bottom select to add to project. Add it to the timeline and turn off the original. Now keep grading. Each time your machine starts to grind to a halt you can render the file and add it to the timeline.
Thanks! I only changed the preview from software to CUDA GPU preview and it works amazingly well… Now I can continue my project!! IT’S LIKE I HAVE NEW MACHINE!!! THANK YOU!
Hello,
Thank You So Much for this setting profile.
Thankssss
I have my cuda rendering and preview turned on and it still only uses about 15% of the gpu when rendering or playing back in the timeline. My system is a ryzen 7 with 1080ti and 32gb ram. Any Idea what could be the issue? It’s so annoying to have a capable system that acts like such a slug
Hi. I have Dell xps 9570. 15 inch 32gb ram. 4k screen.
Whenever I export the project, for first 2percentahe everything is ok. Then the usage of both GPUs decrease to zero and rendering slows down too much. Then after few minutes GPUs start working then again stop then again work then again stop. A clip which should take 2 minutes to render is now taking about 30mint due to suspicious fall is GPUs work. And system is having CPU thermal issues .
Any one can give advice???
Your post topic is very informative and useful for all readers
Hey Nick,
Did you find any solution? I have the same problem.
I upgraded from an RX 480 8GB to an EVGA RTX 2070 Black (which is a night-and-day difference in performance, don’t get me wrong) and I’ve noticed that, even though I’m OC’ed to 1980MHz and I’ve slapped a 700MHz OC on the GPU memory (runs extremely stable with no thermal throttling whatsoever – stays around 64-68 C surprisingly), playback and rendering caps out at 1400MHz on the core clock. Playback I’m not too concerned with, because it’s buttery smooth, but you’d think that there’d be no limitation on rendering.
Nick, if you’re having thermal issues with your CPU, that’s going to be your problem. What temps is your CPU hitting during export?
Thank you, these settings help as I was unable to get the proxies set for the resolution I needed
Hi very interesting tricks.
You can apture your vision in Adobe Premiere Rush and transfer it to Adobe Premiere Pro for more complex edits. Moving projects from Adobe Premiere is very easy.
This goes far beyond the commenting! It composed
his ideas while reading the article amazingly::)
King regards,
Thompson Valenzuela
I’m amazed, I must say. Seldom do I come across a blog that’s
equally educative and engaging, and let me tell you, you’ve hit the nail on the head.
The issue is something which not enough men and women are speaking intelligently about.
I am very happy I came across this during my search for
something concerning this.
Thanks for these great tips. My GPU acceleration seems to be working but I wanted to make sure I had the latest CUDA drivers installed as you suggested. All I could find online was about the CUDA toolkit but I think that’s about developing for CUDA. Can you point me in the right direction to find the drivers I need to ensure my GPU is working at its best?
Thanks. Working in 4k can be really jittery I hope your tips will help
I followed your instructions and it made a dramatic difference in performance. I could actually play files smoothly (minus effects, of course). I was thrilled. But today, one day later, my files won’t play at all, even with no color correction or anything done to them. This is extremely frustrating. Also, sometimes CUDA is not available as a choice, only OpenCL and software.
I’m working with ProRes RAW files, but if they won’t cooperate I don’t see how I can continue. It’s like doing post on photographs right now. Grrrrr….
Great tips! I’ve been struggling with Premiere Pro’s performance lately, and these optimizations made a noticeable difference. I especially found the memory allocation tweak helpful. Thanks for sharing!